Return to PondKraft Fountain Pumps
PondKraft Fountain Pumps Information and Assembly Guide
| Model | Fountain Height Max | Fountains Included | Max Flow lph @ 1m head | Hose Size (mm) | Running Cost Watts | Extension Height Max | Dimensions |
|
PondKraft 750
|
0.7
|
B,D
|
240
|
12
|
12
|
49cm Max 31cm Min
|
8 x 9 x 13
|
|
PondKraft 1000
|
0.8
|
B.D
|
510
|
12-20
|
16
|
54cm Max 34cm Min
|
10 x 10 x 15
|
|
PondKraft 1300
|
1.0
|
B,D
|
900
|
12-25
|
25
|
55cm Max 36cm Min
|
12 x 12 x 15
|
|
PondKraft 2000
|
1.2
|
B,C,D
|
1500
|
12-20
|
45
|
65cm Max 46cm Min
|
14 x 13 x 18
|
|
PondKraft 3500
|
1.3
|
B,C,D
|
2000
|
20-32
|
60
|
69cm Max 50cm Min
|
20 x 16 x 25
|
|
PondKraft 4000
|
1.6
|
B,C,D
|
2800
|
20-32
|
70
|
98cm Max 70cm Min
|
20 x 16 x 25
|
|
PondKraft 5000
|
1.8
|
B,C,D
|
3300
|
20-32
|
99
|
98cm Max 70cm Min
|
20 x 16 x 25
|
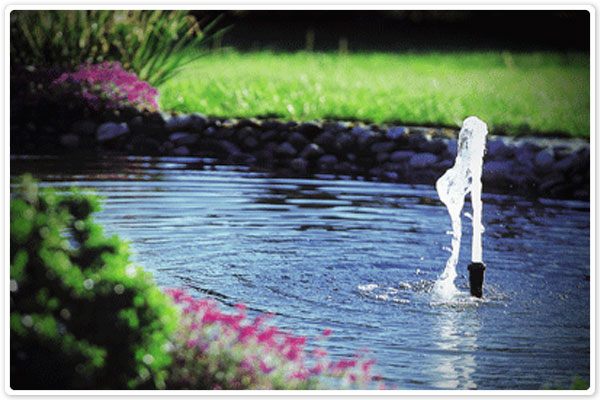
The PondKraft fountain pump range is great value for money. They have a great look and a quality feel, which has made them a very popular choice with our customers. All of the PondKraft Fountain Pumps come with a very sturdy cage to stop the impeller getting clogged from debris! You will also be able to choose from at least 2 fountain heads, so you will be in control of how your fountain pump looks!
Our main emphasis in the Pondkraft range is reliability and longevity. The whole of our PondKraft fountain pump range comes with a 3 year guarantee as standard (no forms to fill out). So should you have any problems, hang onto your receipt and gives us a call. We are more than happy to help with any queries. Alternatively you could always check out our step by step guide on the installation of our PondKraft Fountain pumps.
All of our PondKraft fountain pumps come with an anti clog caging system, this is designed to stop the following: blanket weed, leaves, stones, duckweed and any other pond debris. The reason the cage has been designed this way is to promote the longevity of your fountain pump! It gives you piece of mind that the impeller will not get blocked up and that the fountain pump will last a long while into the future.
To further aid your fountain pump you could also always take a look at our Zenith Pump Float or the Aqua Varia Pump Stand. Using either one of these products would all but eliminate the need of cleaning your fountain pump cage. The reason behind this is that you are raising the pump from the sludge in the bottom of the pond, therefore the fountain pump will be taking cleaner water. With the pump being raised you can be safe in the knowledge that the pump will be working 24/7 providing the pond with oxygen and water movement
Each one of the PondKraft fountain pumps comes with a telescopic extension piece, the size ranges these can go to are listed above in the performance table. The extension piece on each of the pumps screws directly onto a flow adjuster t piece. The flow adjuster is basically a tap that you turn with a plus and minus symbol on there you can turn it up or down accordingly, so you’re in control of the fountains pump and spitter/ waterfall functions*
All of our PondKraft fountain pumps come with at least two fountain heads, so you can choose which you prefer or alternate between the two. The fountain heads that are available with each pump are listed below in the performance chart.
Our PondKraft fountain pump range does not come with a plug attached, so you will need to have a look and read about electrical safety.
Handily our PondKraft fountain pump range comes with a massive 10 metres of cable. If you do happen to find there is not enough cable you can easily add more by using a plug and socket connector. We have a few different types, so please choose which applies to your needs. (Under water or above ground)
* The PondKraft 750 fountain pump can only operate a fountain or spitter function not both.
Please look at our how to guide and performance chart above for further information:
How To Guide for PondKraft Fountain Pumps
PondKraft 750
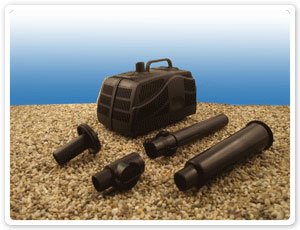
1) The PondKraft 750 is an adaptible little fountain pump that has multifunctional uses; To be used as a fountain pump, to power a spitter, housed within a water feature or within a water butt to lift the water from the bottom of it etc. The PondKraft 750 fountain pump will accept hose sizes of 12mm which is normally industry standard for water features and spitters. This little fountain pump will pump water up to a head of 0.7m and it will deliver 240 Litres when it gets there!
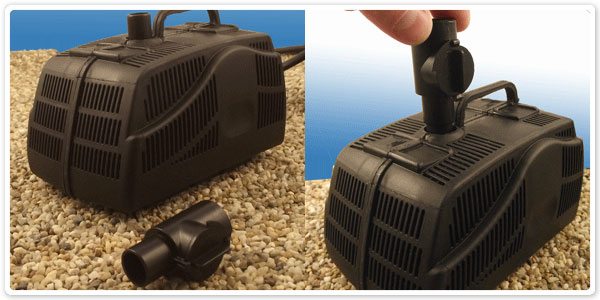
2) To start the building process for the PondKraft 750 for it to be used solely for a fountain purpose you need to start with the flow adjuster (pictured in the first diagram underneath the pump) The flow adjuster will allow you to regulate the height your fountain needs to be, it has a turning dial on the side to do this. The flow adjuster will simply push fit onto the motor outlet attachment, the thinner end is the end that pushes in.
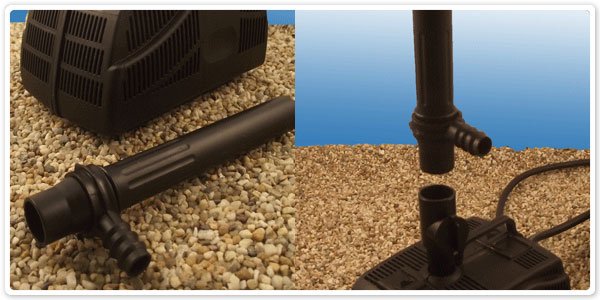
3) The next stage is to attach the telescopic extension piece. The part needed is shown (above left) you will notice that the telescopic extension has a side outlet (this can only be used in conjunction with the fountain on certain occasions). So we normally recommend that this is turned to the off position, allowing all the water flow to the fountain stem. The telescopic extension is again a push fit part so will slot tightly into the flow adapter.
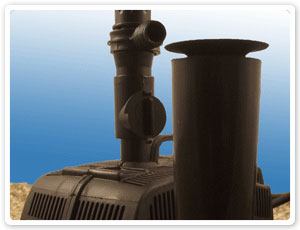
4) The next step is to determine which fountain head attachment that you want to use. There are two different options that come with this model: The two tier fountain and The bell jet. Once you have chosen the correct one for you (consider how windy it is though, high winds will spray the two tier over your garden dropping the water level in your pond) Pictured above is the bell jet, this is a simple push on fit. The size of the bell can be controlled by pushing the top in and out, so have a play with it and see how you want it to look! If you want to use the two tier fountain attachment instead, this again this is just a simple push fit onto the tube.
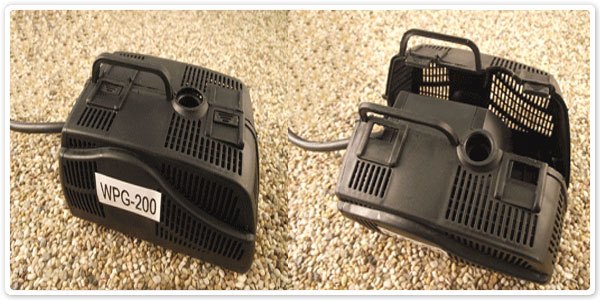
5) Once the fountain pump has been up and running for a while, like any other piece of pond equipment it will need maintaining. Firstly you will need to give the cage a good wash, this can be done with a hose pipe, or a bucket sponge and water.
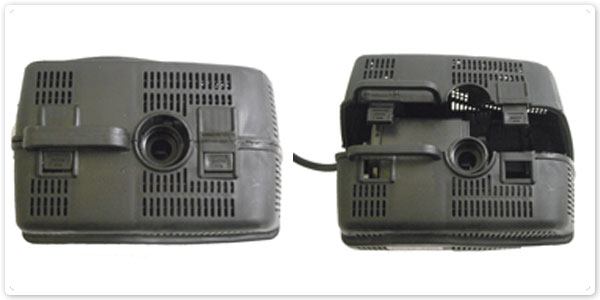
Next you will need to open the cage and clean the inside of it. Its really easy to do! With the above pictures you will see how the fountain pump should look when opened and closed. The left hand picture shows the two push clips in the closed position, these keep the cage held together, just so the motor remains unblocked. To open the cage, I would say to place the fountain pump on a flat working space and place a thumb on either clip, and then push down and away from you, this will release both clips and the cage.
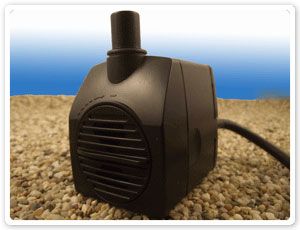
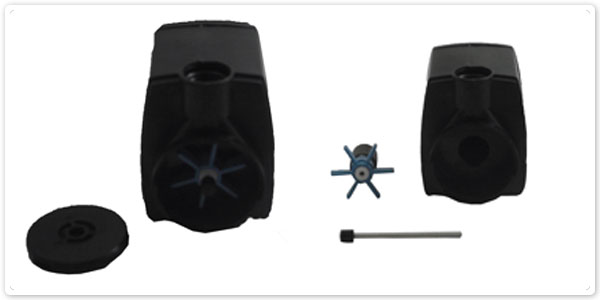
6) Once you have the pump out of the cage, you will notice on the front that there is a dial that controls the flow from the pump (shown arrow 1). Since this is a small fountain pump you will probably just leave that set to the maximum plus sign. To clean the inside of the pump, you will need to lift off the dial front cover. In the picture marked picture two on the right hand side, you will notice a small indentation. This cleverly designed indent, allows you to put either a thumb or finger behind it. Once you have got a thumber or finger on each side simply pull the front cover from the main body of the fountain pump.
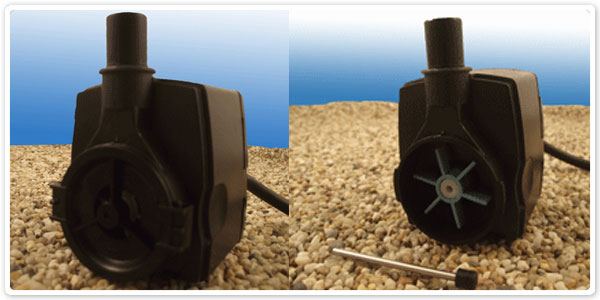
7) After you have removed the flow control front panel you will see in front of you what is illustrated in the left hand picture. The two protruding clips need to be turned anti clockwise, you will find this can be sometimes a little stiff at first but it will turn! Once you have loosened the seal it won’t be difficult in future. After you have removed the impeller front cover you will be able to pull out the metal shaft. This then will allow you access clean the impeller if necessary or replace the impeller.
PondKraft 1000
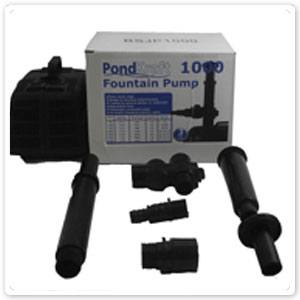
1) The PondKraft 1000 fountain pump comes with the above 7 main parts. The 6 fountain attatchment parts are located within a clear plasted bag inside the main box. If you open them out onto a table and just make sure you have all the correct parts, you will be able to start the assembly process.
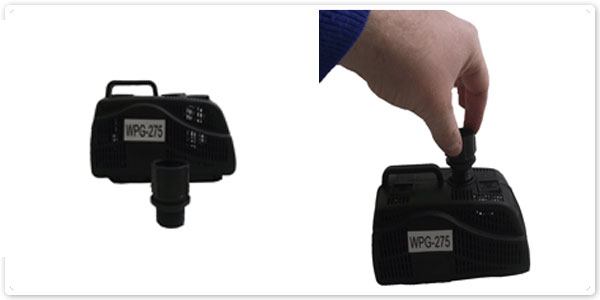
2) Shown above in the first two pictures is what you will need to start building the PondKraft 1000 fountain pump. This piece is basically a joining component that allows you to connect to the flow adjuster. It connects the pump body and the fountain attachments together basically. This part is a simple screw thread; don't however over screw this part in, this will make it loads easier if you ever need to change any components!
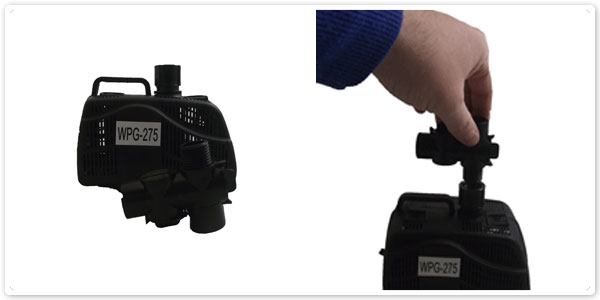
3) Next you will need to attach the flow adjuster. This component will allow you to regulate the flow between your fountain/spitter/filter or waterfall (dependant on how your are using the fountain pump, the PondKraft 1000 can only be used for two functions at any one time) the flow adapter like the majority of the PondKraft fountain pump range is a screw fitting. So line up the flow adjuster with the connection piece and screw in anti clockwise until a small amount of resistance has been felt. You will now be ready to move onto the next stage.
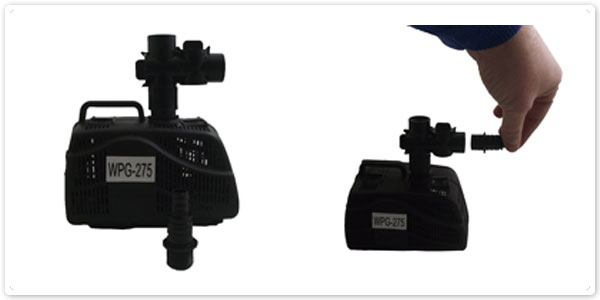
4) Stage four is all about attaching the multi stage hose adapter. This can and needs to be cut down if you are using the 25mm hose fitting. To do this just use a general hack saw, but make sure you double check you are cutting at the right place! The multistage hose fitting is again a screw thread and is to be turned in an anti clockwise fashion so just screw it in place until resistance is felt.
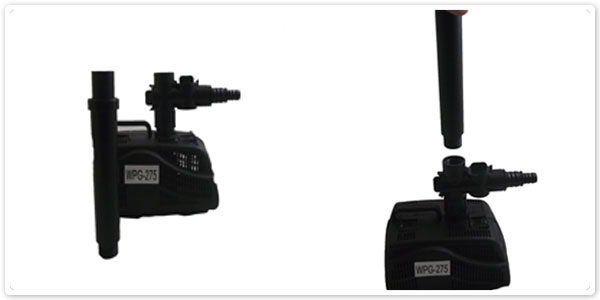
5) The next attachment stage is the telescopic fountain attachment. This is fully extendable up to a maximum of 54cm. You will be able to determine if you need to sit the pump on something or just reduce the telescopic head height down. The telescopic extension again just needs to be screwed into the flow adjuster in a clockwise motion, this is to be done until a small amount of resistance has been felt.

6) After you have attached the telescopic fountain pump attachment, you need to decide which fountain head you want to use. There are two fountain heads that come with the PondKraft 1000, the bell jet and the two tier fountain. The two tier fountain jet is best used to provide extra oxygen, you do however need to be careful in high wind. This can be an often cause for mysterious water loss in a pond! The fountain attachments are both push fit so they will fit snugly into the telescopic fountain extension. This is the fountain pump ready and working to be used in your pond.
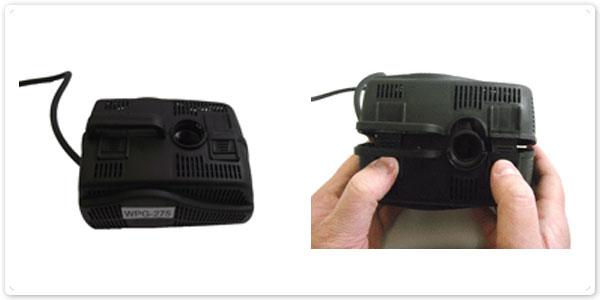
7) Sometimes you will find that you have to do some general maintenance, this may involve cleaning the outside strainer cage also. This is really simple once you know how and have got into the cage and the impeller before. In the two diagrams you can see in the first picture the two push clips that release the main cage body. The like shown just have to be press in and away from you, I found this easiest to do by using my thumbs, but just open it however is best for you!
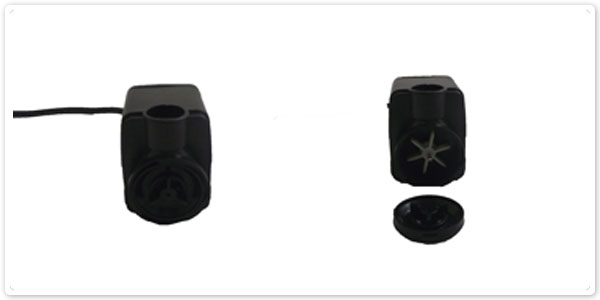
8) The above two illustrations show what you will find when you have removed the pond cage. This is the fountain pumps motor. You will notice on the front of the body a turning out case that when removed reveals the impeller. This to remove for the first time can be a little stiff and awkward. So please do preserver with it, it turns in an anti clockwise turning motion, and when this has turned lift the casing away from the motor. Once inside you will be able to tell if the impeller needs cleaning or is damaged in any way. Its best to have a look inside the impeller cage every couple of months to keep your fountain pump working smoothly.
PondKraft 1300
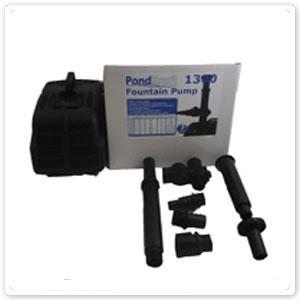
1) Our PondKraft 1300 fountain pump is very versatile. It is big enough to really cope with doing a small waterfall while maintaining a fountain head. It's great for a small pond for water movement. It comes with a choice of two fountain heads as you can see above, one is the bell jet and on is the two tier fountain head. This pump can accommodate hose from 12mm - 25mm so can be used for any garden spitter. At only 25 watts it wont be costing you loads on electric either and a small price tag of £34.99 makes this even more appealing! Above shown are all the parts you need to start building your PondKraft 1300 so please read on if you need any further assistance!

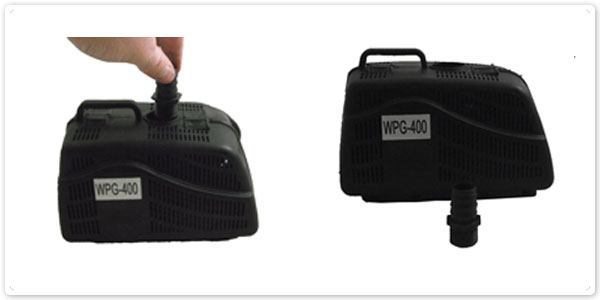
2) To start the building of your PondKraft 1300 you need the above shown connector. This screws clockwise into the main body of the pump as shown (above right). It will be a nice easy anti clockwise turn. Make sure you don't overturn though, otherwise you will cross thread the connector, just turn until a gentle resistance has been felt.
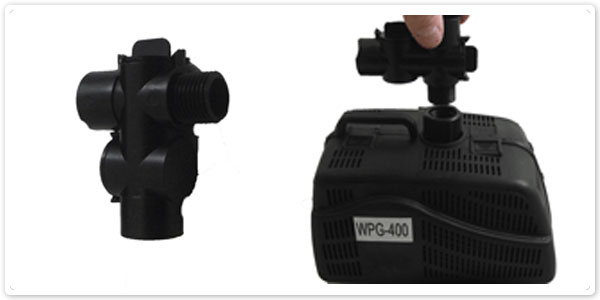
3) In the third stage of building your PondKraft 1300 you will need to locate the flow adjuster. The above left diagram shows this part and the screw thread that will fit into the connector you have just installed. The flow adjuster is there not only to control the flow between fountain and the secondary hose tail but to act as a connector for the telescopic extension. When screwing in the flow adjuster just like with previous parts just look for a slight resistance and then move onto the next bit.
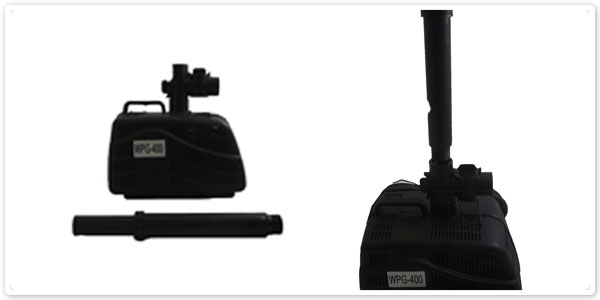
4) Step four is really easy. You need the telescopic extension piece, as with the rest of the items we have been installing this is a screw fitting and will screw clockwise into the flow adjuster. Again here be careful not to cross thread as it will be impossible to do any maintenance on it in the future.
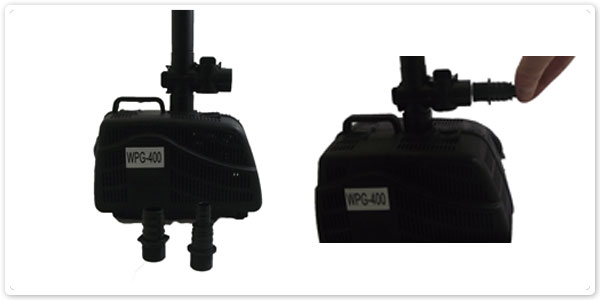
5) Stage five is deciding on which hose size you will be using (obviously if you're going to use it as a fountain only you can just leave it without a hosetail) the PondKraft 1300 can accommodate 12, 20 and 25mm hose. I would say for a waterfall always use the biggest available unless it just isn't possible, so in this case the 25mm. The 25mm is shown (above left) if you have to use the 20mm make sure you cut of the 12mm attachment, this stops the flow been restricted. As with any of the above this is a screw thread and just tighten this accordingly.
6) Step six is chosing the correct fountain head for your garden to suit specific requirements. What i am meaning here is: If you are using the pump 24/7 unless it can be monitored go for the bell jet. Otherwise if you use the two tier fountain, if high winds get up while you are away this can be the cause of many people mysterious water losses within there ponds! Both the fountain attachments are a push fit, i think the easiest way to fit these is by holding the moving extension piece and then slotting over the fountain head.
7) The PondKraft 1300 can be used as just a pump to go to a waterfall or even as a spare pump to empty your pond for water changes. Above is shown how you can use the 25mm attachment to do this. Simply just screw the hosetail clockwise into the main body of the pump, fit your hose and clip and its sorted!
8) With any pump over time you will have to unfortunately do maintenance. Done often and correctly though makes it loads easier. To clean the outside cage can be just hosed off, you may need to open the cage to do this as well. To open the cage as seen above you need to press in the two clips with your thumbs, they will push in easy and then all you have to do is manoeuvre this away from you. Once inside the cage remove the motor and give the cage a good wash.
9) It may be necessary from time to time to check if the impeller has any debris inside. To take of the front impeller cover for the first time can be a bit difficult. After you have done this once though you will develop a knack for it, then it becomes really easy. I would say to grip the motor of the pump between your knees, then use both thumbs as levers to turn the impeller cover anti clockwise. This will slowly move the cover, allowing you to take it of and put it to one side so you can dislodge the impeller.
For removal of the impeller its easiest first to remove the shaft, take hold of the black rubber protector and pull smoothly out. This will be pretty easy but might need a wobble from side to side, this is because it is attached to a rubber protector at the other end. Once this has been removed you will be able to pull the impeller free from the magnets, this you will find has a small amount of resistance but shouldn't warrant any problems to your self. Once you have removed the impeller, as before just give this all a good clean and rinse and then repeat the process.
PondKraft 2000
1) The PondKraft 2000 fountain pump is perfect to be used for a fountain height of up to 1.2m, and coming with three fountain heads there is plenty of different effects you can get with this fountain pump! Priced at just £39.99 this pump is going to be perfect for people with ponds up to 1500 Litres if combined with a filter or anyone who wants a brilliant feature for those long summer days.
2) To start building a PondKraft 2000, just keep following this guide and it will all be easy! Above shown in the left hand side diagram is the first attachment piece that you are going to need. The above connector is going to screw into the main body of the pump. It will act as a linking device for the rest of the attachments you are going to need to install. Like most of the PondKraft range this connector is a screw thread fitting and will need to be turned clockwise, until a small amount of resistance is felt. Make sure that you dont over tighten though or you will cross thread the screw. Once you have screwed this part in and you're happy that its secure, move onto step 3.
3) Step three we are adding another connector, these all help to improve the overall stability and strength of the pump. Once again we see the uniformed screw thread that you will be turning clockwise, onto the previous connector. Please again do not overtighten the screw thread, as even if it doesn't cross thread it will be difficult at a later date to unscrew! Move to step 4 when this has been completed.
4) In step four we are connecting the main flow adjuster to the pump. The PondKraft 2000 has the ability to control two applications at once. So by using this flow adjuster you are in control of how your fountain pump works. The flow adjuster has a plus and minus on the top so just have a look and a play about when the pump is in situe. To secure the flow adjuster in place, place it over the previous connector and turn clockwise until you feel it is secured tightly in place, then move onto stage 5.
5) If you are using your fountain pump to control two operations you will need to attach the above left hosetail, its a simple screw thread again so just turn clockwise to lock into place. What you will have to consider though is what size hose you will be using? On the PondKraft 2000 you are able to use 20-32mm if you are going to be using either the 25mm or 32mm you will need to cut back the hosetail with a hacksaw, this stops any flow being reduced. Always use the biggest hose size that is available to you!
6) Next you will need to install the telescopic extension piece, this has two components that are interlocking. The inside component is the moving or extending part, allowing you to go to deeper areas of your pond. Make sure you pull enough of the middle extension out so that you have plenty to work with later on, or you will have to unscrew the component. With the extension piece again just screw this clockwise into the flow adjuster until a resistance is felt.
7) Stage seven is to decide which fountain head you are going to use. The PondKraft 2000 comes with a choice of three fountain heads; the bell jet, the two tier fountain and the geyser foam jet. The bell and the geyser jet are probably best for 24/7 operation as they will not operate as high, meaning you don'y lose any water in high winds! All of the fountain attachments are a push over fitting, to do this, make sure that you hold the moving part within the telescopic extension and then place the desired fountain in place. Your pump will now be ready for operation within your pond.
8) If you are using your PondKraft 2000 fountain pump as a back up pump or just simply for a waterfall or feature you can set it up like shown above. You start with the same method as stage one and two but use the hosetail from stage 5. If you are using this pump for just a waterfall always use the 32mm hose fitting to gain maximum flow, otherwise the fountain pump will not pump as much water as stated in the manufactures guidelines.
9) To maintain any of the fountain pumps in the PondKraft range is really easy, the PondKraft 2000 fountain pump is no exception. As shown in the first image to undo the cage simply press down the two indented clips and then slide the cage open. This should not require any amount of force in all honesty so just make sure the clips have been pushed in far enough. Once inside the pump you will be able to determine what if anything needs cleaning, just use either a bucket of water and a sponge or a hose pipe will be fine. To get in at the impeller is really easy when you have found the knack of doing so. I would suggest holding the pump between your knee and using both hands toturn the locking mechanism. This will turn slowly but easily, and once opened the first time will always be easy again!
10) To maintain within the main body of the pump where the impeller is housed. I found it easier if i pulled the impeller free from the magnets holding it in place first. It then makes it easier to remove the ceramic shaft, this with the rubber protector on the end just needs moving from side to side to dislodge it. All you will need to do then is wash the impeller and inside the main body of the fountain pump. The really should be no more maintenance involved than the above to keep your fountain pump working correctly.
PondKraft 3500

1) The PondKraft 3500 is a great fountain pump to use for any pond. If you are just using the pump for a fountain it will power one of three fountain heads with a jet up to 1.3 metres, pretty impressive to say it has such a small price tag. Also with the PondKraft 3500 fountain pump at 1 metre head you can achieve 2000 Litres an hour so this fountain pump really doesn't let you down on power! This fountain pump will accept hose sizes from 20-32mm so will be adequate for most ponds. To start the building process please follow our step by step guide!
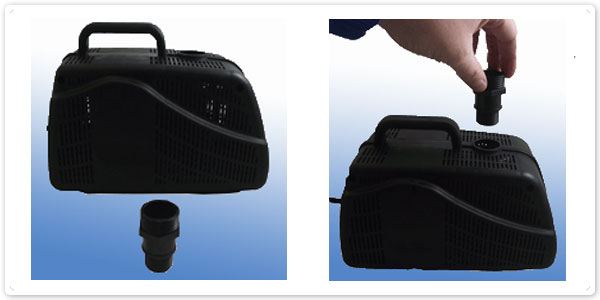
2) To start the building process of your PondKraft 3500 fountain pump you will need the shown connector. This is to be screwed into the main body of the pump. The connector will fit directly into the main body of the pump, you will notice there is a screw thread hole for this to fit into this fitting will turn clockwise into the main body of the fountain pump until you feel a gentle resistance.
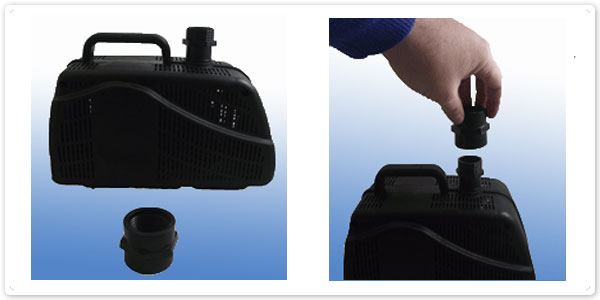
3) The next stage of the building process is the straight adaptor connection. This is designed to make the size of the plastic piping bigger therefore increasing water flow and the overall stability of your pump. Screw this directly over the previous connector, being careful not to cross thread the screw.

4) Stage four is where you attach the main flow control adjuster. The flow adjuster gives you total control over how you will operate your fountain pump. You will be able to have more water going to your; filter, waterfall or feature alternatively you can have all the direction to a big fountain and turn of the other outlet completely. It really is up to you. To attach the flow adjuster simply screw clockwise into the straight connector and set the flow tap to what you think (this can be adjusted later) will be correct for you, then move to stage 5.

5) Stage five, here we will be connecting the hosetail that will take your polyhose to either; a filter, waterfall or a feature. As previously stated you can just have your fountain pump operating a fountain, if so you set the flow adjuster to zero and leave the hosetail off. For this guide though, I will explain how you fit the hosetail, its a screw threaded attachment that turns clockwise into the flow adjuster. Once this has been secured into place you will need to ascertain which hose size you will be using, it is best always to use the maximum size available for your equipment to achieve the best flow rates from the pump. Whichever hose size you choose, 25mm or the 32mm, please cut the hosetail down accordingly this will achieve maximum flow.
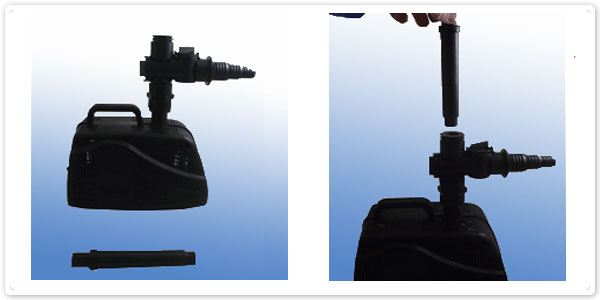
6) Next we will be attaching the telescopic fountain piece. This lets you control the height of your fountain pump depending on the depth of your pond. All in all the PondKraft 3500 fountain pump can go to a maximum height of 69cm so will be fine for most ponds. If you find this is not enough you can always buy a pump stand to sit this on. To attach the telescopic fountain piece just screw it clockwise into place, being careful not to over tighten.
7) The PondKraft 3500 fountain pump comes with a range of three different fountain heads. There is the Geyser jet (a foaming jet thats best for general use) the bell jet (to be used in high winds) or the two tier fountain (used for decoration or oxygen in low winds in the summer) obviously this is just a guide, if it is windy and the fountain pump is near the edge of the pond water can be lost over the side. Choose the fountain head that is best suited to your needs, though you can easily change this later by pushing another fountain head into the top of the pipe. Make sure to hold the extending part of the telescopic extension as you push fit the fountain head. Your fountain pump is now ready for operation!
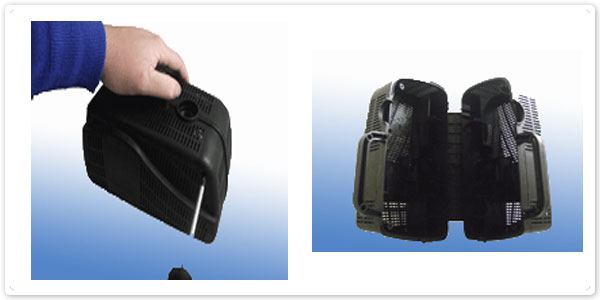
8) After a while you may notice that the flow from your fountain pump may reduce, this is a sign that it needs cleaning. Sometimes you might just have to remove the pump from the pond and hose it down to remove blanketweed or sludge etc, if possible i would suggest to do this every two weeks. On other occasions though, you will have to fully open the cage, you will need a phillips head screw driver to do this. You will find two screws that are horizontal from each other. These both need to be taken out, once they are both removed the cage will prise apart like shown above. You will then be able to fully wash out the cage of any debris that me be inside, this can be done in a bucket of water or with a hose.
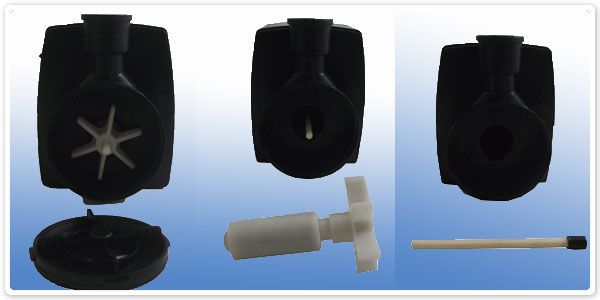
9) If the steps above don't manage to get your fountain pump working, you will have to open the casing and remove the impeller for cleaning. Its really easy if you know how; Hold the fountain pump between your knees and use both your hands to turn the impeller cover anti-clockwise. This will gently prise away, leaving you a full view of the impeller. I found it easier to take the impeller out first, to do this just pull the impeller slowly and firmly away from its magnets. Once you have put the impeller safely to one side, you can then remove the ceramic shaft. This will need to be wobbled from side to side to free the rubber safety cap, then just give it all a wipe with a damp cloth. You might have to do this every couple of months depending on how dirty your pond is.
PondKraft 4000 & 5000

1) The PondKraft 4000 and 5000 fountain pumps are the two biggest in the Bradshaws PondKraft range. They will accept hose sizes of 20-32mm making them ideal for most pond users. With fountain head heights of 1.6 (PondKraft 4000) and 1.8 metres (PondKraft 5000) they are not lacking on power either. They will deliver at 1m head, 2800 and 3300 litres an hour so can be used for most small and medium sized ponds to power a filter and fountain. I have shown above everything that comes within the packaging that you will need to build your fountain pump, both the 4000 and 5000 are the same when it comes to the building process.

2) To start the building process for your PondKraft 4000 or 5000 fountain pump, you will need to start with the above adaptor. This is a simple screw threaded fitting and will attach into the main body of your fountain pump. To attch this you need to turn it anti clockwise into the main fountain pump body until you feel a gentle resistance. Be really careful not to cross thread any of the parts as they are a pain to get out if you do!
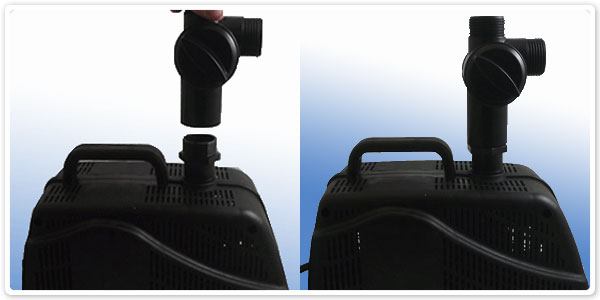
3) Stage three will see you attach the flow control adjuster for your fountain pump. This will allow you to control exactly how you want your fountain pump to work and what levels of water are directed to the fountain and to your filter or waterfall. Obviously you can also set the flow control so it just powers a fountain if you want. To attach the flow adjuster just place over the above adaptor and screw clockwise into place.
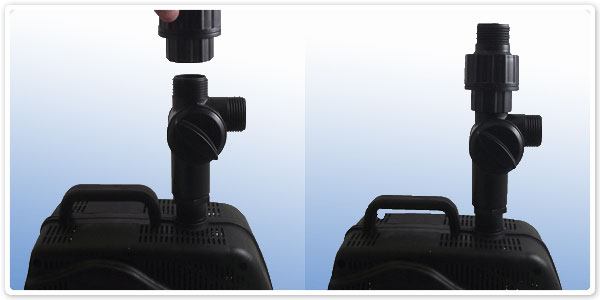
4) Stage four you will need to attach the ball joint. This is a handy part if you have an undulating bottom to your pond as it allows the fountain heads to be set at different angles. To achieve the angles you need to move around the middle ball joint and then simple clockwise tight in the screw into place. Its probably easier to loosely screw the ball joint, acquire the angle you need and then tighten.
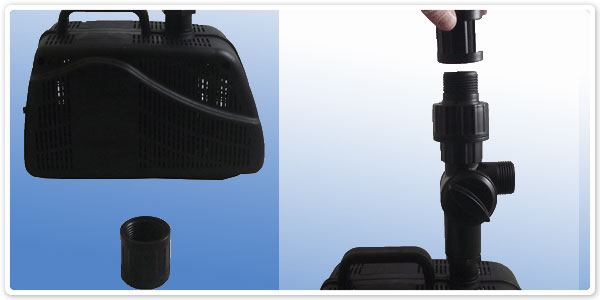
5) In stage find you will need to locate one of the straight connectors from your bag of parts. This will be screwed directly over the ball joint to allow the fitting of the telescopic extension piece for your fountain pump.
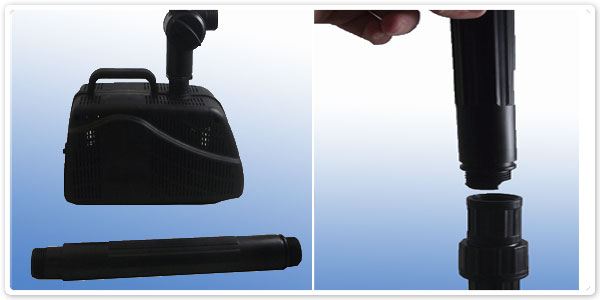
6) In stage six you be fitting the telescopic extension to your PondKraft 4000 or 5000 fountain pump. This will be able to give your fountain pump a maximum height of 98cm meaning it will be able to sit on the bottom in an area of most ponds. To attach the telescopic fountain piece make sure you pull enough of the extending piece of to work with at a later date, then screw onto the straight connector turning clockwise until a small amount of force has been applied, you can then move on.
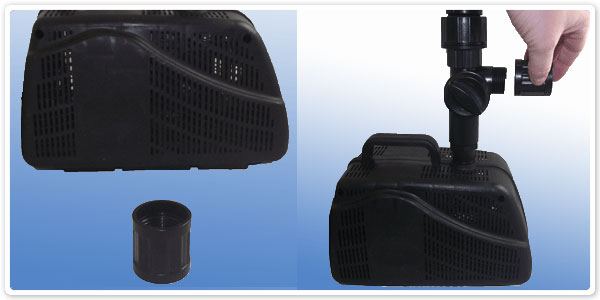
7) Stage seven has two steps, you will need another of the straight connectors and also which ever hosetail is applicable to your needs. Please remember to always use the largest connection and hose size thats possible. If your installing a brand new system, always use the 32mm. If you use a smaller hose size, you will never get the same amount of flow as the manufactures guidelines as water will be lost through friction. Start by attaching the straight connector as previously turn clockwise until the item is securely in place, then screw your hosetail that you are using into the straight connector and turn once again until secure.
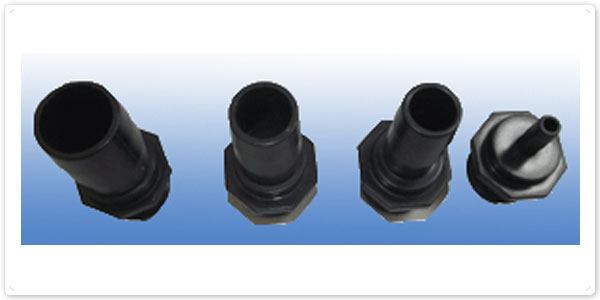

8) With the PondKraft 4000 and 5000 they come with three fountain head attachments; the geyser jet (which will create a foaming jet, great for oxygen and all round general use. The two tier fountain which is brilliant for those long summer evenings with friends round, but not to be used in high winds. The bell jet which can be used if you are going away or dont want to hear lots of water movement. The two fountains shown above are the Geyser Jet and the Bell Jet, they are both a screw fitted attachment and are to be screwed directly onto the telescopic fountain attachment. You will need to keep a hold of the moving piece within the telescopic extension piece while screwing the fountain head in place.
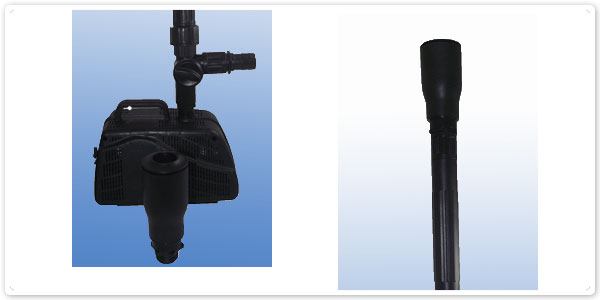
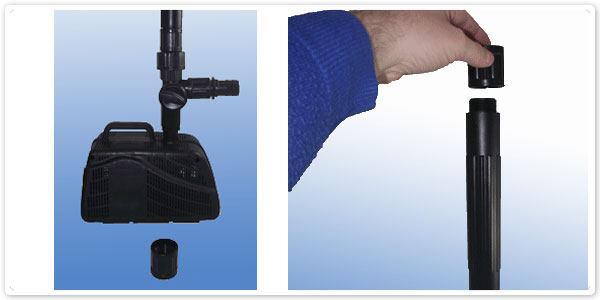
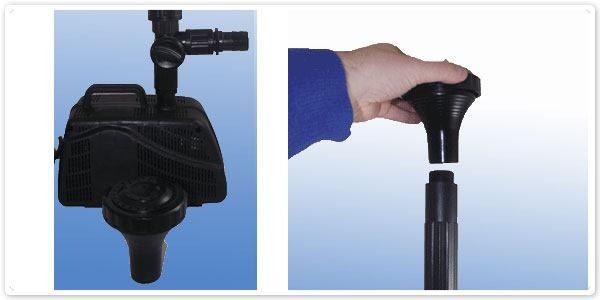
9) To attach the two tier fountain you will need to use another straight connector, this will screw clockwise onto the top of the telescopic fountain attachment. This will then allow you to take the two tier fountain and be able to screw directly intro the straight connector. I would adivce to keep the straight connector and fountain head screwed together so you don't loose either piece when it isn't in use.
10) Step ten and eleven will explain how to do general maintenance on your PondKraft 4000 or 5000 pump. You will know if your pump needs cleaning as the water output will dramatically slow down. So to do this take your pump out of the pond and remove the fountain attachment. You will be able to then quickly hose and wipe down the outside of the cage, allowing you access to the two screws that hold the fountain pumps cage together. For this you will need to use a phillips head screw driver and unscrew the screws anti-clockwise. This will allow you to prize open the cage and give you access to the main body of the pump. I would just now give the full cage a good rinse off and free it from any sludge and debris that will be inside.
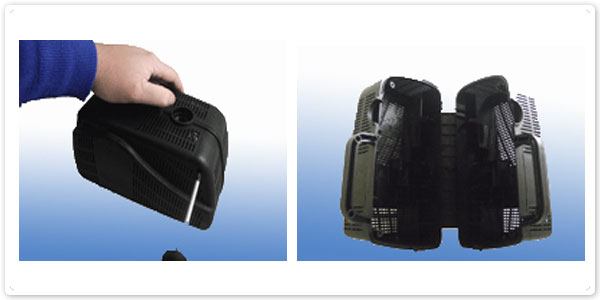
11) Its always a good idea to check if the impeller is free from debris, sludge and blanketweed also. To remove the front protection case of the PondKraft 4000 or 5000 fountain pump can sometimes be a little tricky at first. Once you have removed it though, it wont be difficult again. I would advise to put your fountain pump between two levers be it on a work bench or between your knees, and use two hands to turn the front protection case anti-clockwise until it stops moving. The case will then lift of allowing you to be able to release the impeller and then the ceramic shaft. Once this has been done you will be able to clean inside the main motor and also give the impeller and shaft a wipe down to make sure they keep running smoothly.


